
How to Use 360 Photos for Construction Site Instructions and Documentation
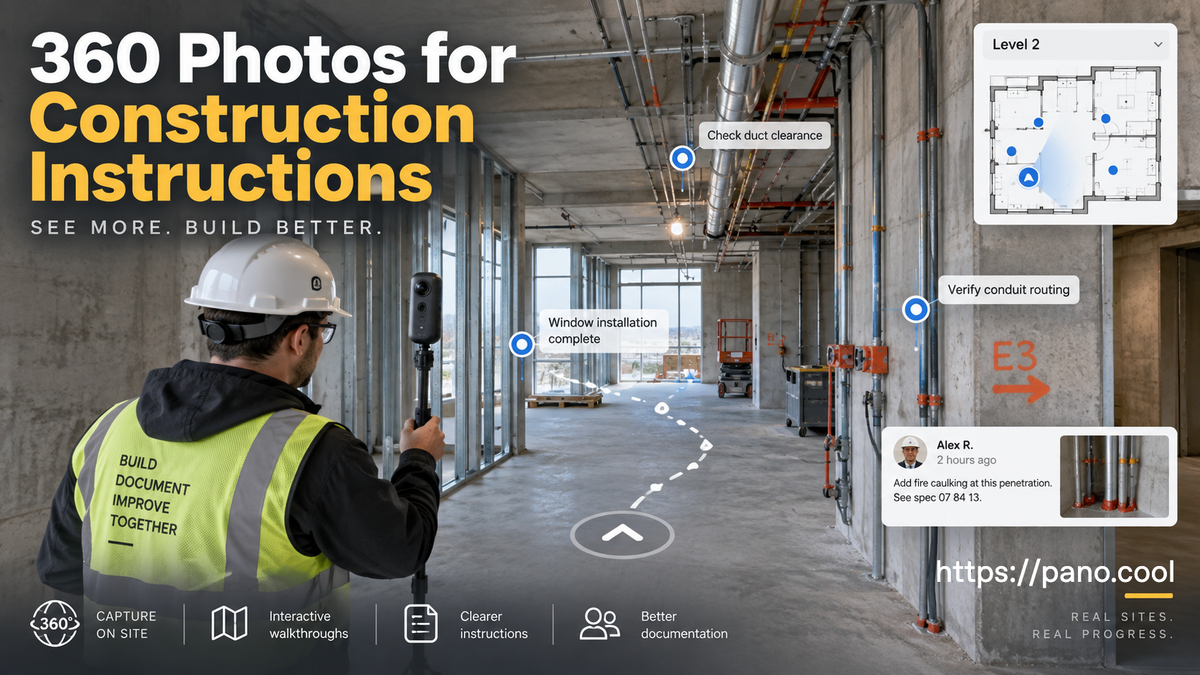
Construction sites change every day. Walls go up, utilities are installed, equipment moves, issues are discovered, and completed work can quickly become hidden behind the next stage of construction.
Because of that, good visual documentation is an important part of almost every construction project.
Traditional photos are useful, but they only show what the photographer decided to point the camera at. A 360° photo captures the entire surrounding area from one position, giving project teams much more context when reviewing the site later.
And when those 360° photos are organized into an interactive walkthrough, they can become more than documentation. They can also be used as a visual instruction system for workers, contractors, inspectors, clients, and other project stakeholders.
Why Construction Sites Need Good Visual Documentation
Photos are already commonly used throughout construction projects for many different purposes.
They can help with:
- Site inspections and QA/QC — document workmanship and identify areas that need correction.
- Progress tracking — record how different areas change from one construction stage to another.
- Project reporting — provide visual evidence for weekly or monthly progress reports.
- Safety inspections — document hazards, access routes, temporary structures, or areas that require attention.
- Work instructions — visually show workers where something needs to be installed, repaired, removed, or inspected.
- Remote site reviews — allow project managers, architects, engineers, clients, or consultants to inspect an area without always travelling to the site.
- RFI and issue documentation — provide visual context when discussing questions or problems associated with a specific location.
- Existing-condition records — document the condition of a site before construction, renovation, or demolition begins.
- MEP documentation — record electrical, plumbing, HVAC, and other systems before they are hidden behind drywall, ceilings, or finishes.
- Handover and as-built documentation — provide a visual reference of the completed project for owners and facility managers.
- Claims and dispute records — preserve visual evidence of what was present at a particular stage of the project.
- Training and site orientation — help new workers understand layouts, access routes, restricted areas, equipment locations, and procedures before entering the site.
Construction teams are already using 360° photography for workflows such as progress documentation, QA/QC walks, RFIs, risk mitigation, existing-condition capture, and recording MEP installations before they are covered. Virtual access can also reduce unnecessary site visits and help more team members review conditions remotely.
Why Use 360 Photos Instead of Only Normal Photos?
The biggest advantage is simple: a normal photo records a direction. A 360° photo records the space.
Imagine standing in the middle of a mechanical room.
With a normal camera, you may need to take separate photos of the front wall, rear wall, ceiling, floor, equipment, pipes, doors, and surrounding areas. Even then, it is easy to forget an important angle.
With a 360 camera, one capture records everything around the camera position.
Later, viewers can look left, right, up, down, or behind them.
This can be especially valuable when someone reviewing the documentation notices something that the photographer did not consider important at the time of capture. Instead of discovering that the required angle was never photographed, there is a good chance that it is already visible somewhere in the 360° image.
More Context Around Every Issue
Context is particularly important on a construction site.
A close-up photo might clearly show a defect, but someone looking at the photo later may not know exactly where that defect is located.
A 360° view can show the issue together with the surrounding columns, doors, walls, equipment, rooms, and other recognizable features.
That makes it much easier to understand where something is and what surrounds it.
Build a Visual History of the Project
If you capture the same locations regularly—for example, every week or at important construction milestones—you can gradually build a visual record of the entire project.
This can be valuable months or even years later.
For example, if someone needs to know where a pipe or electrical connection was located before a wall was closed, an older 360° capture may provide the answer.
360° documentation can therefore become a useful visual archive throughout the lifetime of a project, rather than simply a collection of photos stored in folders.
Capturing High-Quality 360 Photos Is Much Easier Today
360 photography used to require specialized panoramic equipment or multiple photos that had to be carefully stitched together.
Today, compact consumer 360 cameras make the process much simpler.
Popular options include cameras such as: Insta360 X6, Insta360 X5, DJI Osmo 360
These are small cameras that can easily be carried around a construction site and positioned on a monopod, selfie stick, tripod, or other suitable mount.
Modern models can also capture very high-resolution imagery. For example, the Insta360 X6 supports 120MP photos, while the X5 supports 72MP photos. This means construction teams no longer need an expensive specialist photography setup simply to create useful panoramic site records.
A practical workflow could be as simple as: Walk to a location → position the camera → capture a 360 photo → move to the next location.
The result can then be organized into something much more useful than a folder full of JPG files.
Turn 360 Photos Into an Interactive Construction Walkthrough
Once you have captured your 360 photos, you can upload them to PanoCool and organize them into an interactive virtual walkthrough.
Instead of opening individual images one by one, viewers can move through the construction site in a familiar experience similar to navigating Google Street View.
For example: Entrance → Lobby → Corridor → Room 101 → Mechanical Room
This makes it much easier for someone who was not present during the capture to understand the relationship between different locations. But the walkthrough itself is only the beginning.
Add Instructions Directly Inside the Site
One of the most useful applications of a 360 walkthrough is attaching information directly to the place where it is relevant.
Instead of writing:
Check the pipe installation near the north wall of Room 204.
You could place a point directly on the pipe inside the 360° scene.
When the viewer opens that point, they could see:
Check pipe clearance before ceiling installation.
The person viewing the project can immediately understand both what needs to be done and exactly where it needs to be done.
With PanoCool, a construction walkthrough can include tools such as:
Points of Interest
Place interactive points directly on equipment, structures, walls, doors, utilities, or other areas that require attention. These can be used for inspections, work instructions, warnings, or highlighting important site information.
Annotations
Add visual annotations to explain an issue or draw attention to a specific part of the 360° scene.
For example: Incorrect installation — move approximately 100 mm to the left.
Instead of trying to describe the location in a long message, the instruction appears directly where the issue is visible.
Popup Information
A hotspot can open additional information such as:
- Installation instructions
- Specifications
- Inspection notes
- Safety information
- Material details
- Equipment information
- Links to external documents
This can turn the virtual walkthrough into an interactive instruction manual for the site.
Photo Galleries
Sometimes a 360 view provides the overall context while normal photos provide the detail.
You can attach a photo gallery to a location and include close-up images of an installation, defect, drawing, reference image, or completed work.
This combines the spatial context of 360 photography with the detail of traditional photography.
Floor Maps
For larger projects, a floor map makes navigation much easier.
Users can see where each 360° capture was taken and jump directly to a particular room or section of the building.
For multi-floor buildings, scenes can also be organized by floor.
Quick-Access Menus
A menu can provide direct access to important locations such as:
- Level 1
- Level 2
- Mechanical Room
- Electrical Room
- Roof
- Loading Area
- Safety Issues
- Inspection Points
Instead of navigating through dozens of scenes, users can jump directly to the area they need.
Leave Comments Directly Inside a 360 View
Construction communication often involves a lot of back and forth:
Which wall are you referring to?
Is it the pipe next to the door?
Can you send another photo?
Where exactly is this problem?
With the SiteSync theme in PanoCool, visitors can leave comments associated with a particular 360° view.
This creates a more location-based way of communicating.
A supervisor, engineer, client, or contractor can navigate to an area, look in the appropriate direction, and leave a comment there.
Instead of discussing an issue separately from its visual context, the conversation can happen directly inside the virtual site.
Example: A Visual Instruction Walkthrough
Imagine that a supervisor walks through a project at the end of the day and captures 360° photos throughout the building.
After uploading them to PanoCool, the supervisor creates a walkthrough and adds several instructions:
Room 102
Add an annotation showing an unfinished electrical outlet.
Corridor A
Place a point indicating where a fire extinguisher must be installed.
Mechanical Room
Add a popup containing equipment specifications.
Level 2 Staircase
Mark an area requiring a safety barrier.
Meeting Room
Attach a gallery containing reference photos showing the expected finish.
The next morning, contractors can open one link and virtually walk through each location.
Rather than reading a long report and trying to understand where every instruction applies, they can see the site, see the issue, and see the instruction together.
Embed a Construction Instruction Project
Below is an example of how a 360° construction instruction project can be presented:
Try moving through the project, opening information points, viewing annotations, and checking different locations from the floor map.
Or open this link in a new tab: https://pano.cool/p/01KREQDG9Z661SFG6KKCAS9XGF
One Capture Can Serve Multiple Purposes
One of the most practical advantages of this workflow is that the same set of 360° photos can serve many purposes.
The photos captured for progress documentation today may later help with: Inspection → Reporting → Instructions → Remote review → Handover → Future maintenance
You do not necessarily need a separate capture for each task.
By consistently documenting important locations, you gradually create a visual database of the project.
And because each capture records the entire surrounding space, there is often much more information available than there would be in a collection of carefully framed normal photos.
A Simple Workflow to Get Started
You do not need to document every square meter of the construction site on your first attempt.
Start with important areas and build a repeatable workflow:
1. Capture
Take a 360° photo at important locations around the site.
2. Upload
Upload the images into a PanoCool project.
3. Connect
Connect nearby scenes to create a walkable experience.
4. Organize
Add floor maps, levels, and menus so users can easily find locations.
5. Add information
Place points, annotations, popups, galleries, and instructions where needed.
6. Share
Send one link to contractors, project managers, inspectors, engineers, or clients.
7. Repeat
Capture the same locations during future milestones to build a visual history of the project.
Make Construction Instructions More Visual
Construction projects are physical and spatial, but a large amount of construction communication still happens through text messages, reports, spreadsheets, and isolated photographs.
360° photography provides another approach.
Instead of only telling someone what needs attention, you can show them where it is, what surrounds it, and what it looked like at that moment.
Combined with an interactive walkthrough, maps, annotations, information points, galleries, and location-based comments, a simple 360° photo can become a practical tool for documentation, inspection, instruction, and collaboration throughout a construction project.
With compact 360 cameras becoming increasingly accessible, creating this kind of visual site record no longer needs to be complicated.
Capture the site, organize it in PanoCool, add the information your team needs, and share the complete construction environment through a single interactive link.
Start using PanoCool: https://pano.cool
Some Youtube tutorial videos: